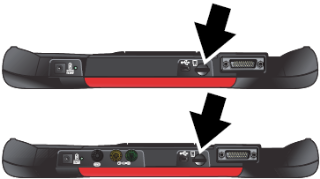
Upgrading Using the "Upgrade" microSD Card
This instruction sheet describes how to upgrade your
diagnostic software using the microSD (uSD) upgrade
card.
These instructions apply to the following
diagnostic tools/families:
Before You Begin
Have the following items on hand:
|
●
|
Diagnostic tool with a fully charged battery pack |
Upgrading Diagnostic Software
|
1.
|
Turn the diagnostic tool off, and disconnect the
AC power supply.
|
The diagnostic tool must be
turned OFF before removing the uSD card.
|
2.
|
Gently push down on the uSD card, located on the
top of the tool, to release it. Then remove and
discard the uSD card |
|
3.
|
Install the new uSD upgrade card into the card slot
on top of the tool, and gently push down to lock into
place.
|
The uSD upgrade card fits into the card slot
facing in one direction only. Make sure the card is
correctly oriented and do not force it into the slot. When
properly installed the top of the uSD card will be flush
with the housing.
The diagnostic tool MUST be
powered by the AC Power Supply to perform
this procedure.
|
4.
|
Connect the AC power supply to the tool, and to a
AC power source. |
|
5.
|
The software license agreement displays. After
reading the agreement, check the box and then
select "Agree and Continue" to proceed.
An update screen displays as the upgrade software
is installed. This process may take several minutes. |
|
6.
|
Once completed, press Y/a to complete the
upgrade. |
|
7.
|
Leave the new uSD upgrade card installed. |
The upgrade is complete, and your diagnostic tool
is ready to use.


